
Basic Operations
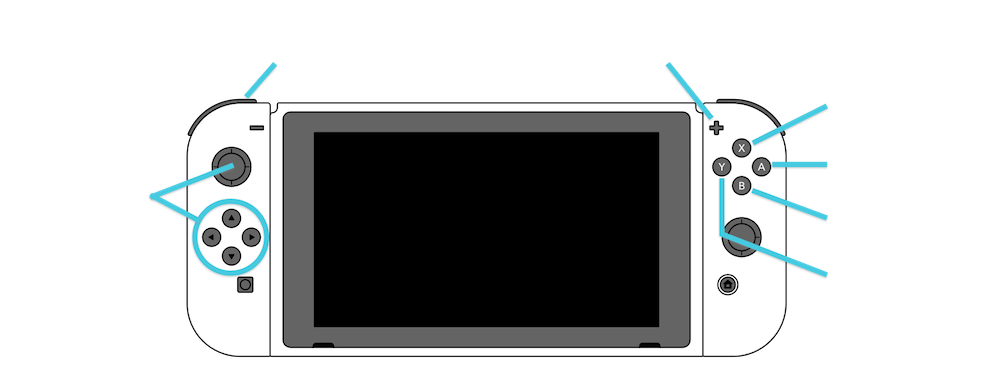
Basic Controller Operation
|
Left Joystick / Direction Buttons |
Cursor Movement |
|
A Button |
Setting Used to select current item and to advance. |
|
B Button |
Cancel / Return Cancel the currently open menu and return to the previous screen. |
|
X Button |
Open Menu Opens the menu at the current cursor location. |
|
Y Button |
Play / Stop Start and stop a song. Long press initiates record mode, during which gadget performance and nob operations are recorded. |
|
+ Button |
Screen Navigation Used to navigate between screens. |
|
L Button |
Shortcut Operation Pressing this button causes the operations that can be performed on the current screen to be displayed. By pressing the appropriate button, the convenient functions can be accessed directly. |
Save / Load Operations
From the overview screen, select “System” → “Save” or “System” → “Load” to save or load a song.
*If multiple controllers are in use, save and load operations can only be used on Controller 1
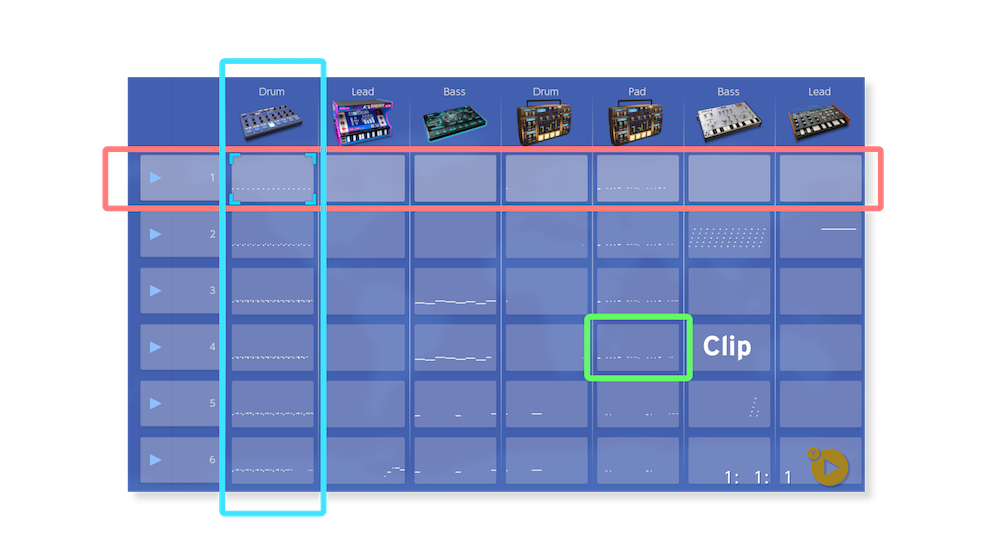
Overview Screen Operations
View an entire song on this screen.
|
Track |
Each vertical column makes up a part of a song, and corresponds to one gadget instrument. Arrange several gadget instrument tracks, such as drum track, bass track etc, to create a song. |
|
Clip |
A “clip” is a sequence of notes. The gadget instruments on each track perform these notes during playback. Each track can be set individually, and the number of bars in each clip can vary. |
|
Scene |
The horizontal blocks in each song represent scenes. The clips in each track are played back simultaneously. Songs are constructed by placing together a variety of scenes. For example, “Introduction”, “Melody A”, “Bridge” etc. |
Main Operations
|
Move between gadget screen and piano roll |
Select the gadget icon on the top of the screen and press the A button to access the gadget screen. Select a clip and press the A button to access the piano roll screen. |
|
Add Track / Scene |
Select the “+” button and then press the A button to add a track or scene. |
|
Song Setting |
Select “Song Settings” from the menu to set the song title, tempo, and swing. |
|
Setting and Editing Track / Scenes |
By selecting the gadget icon or scene play and opening the menu, one can duplicate, delete, or edit the name. |
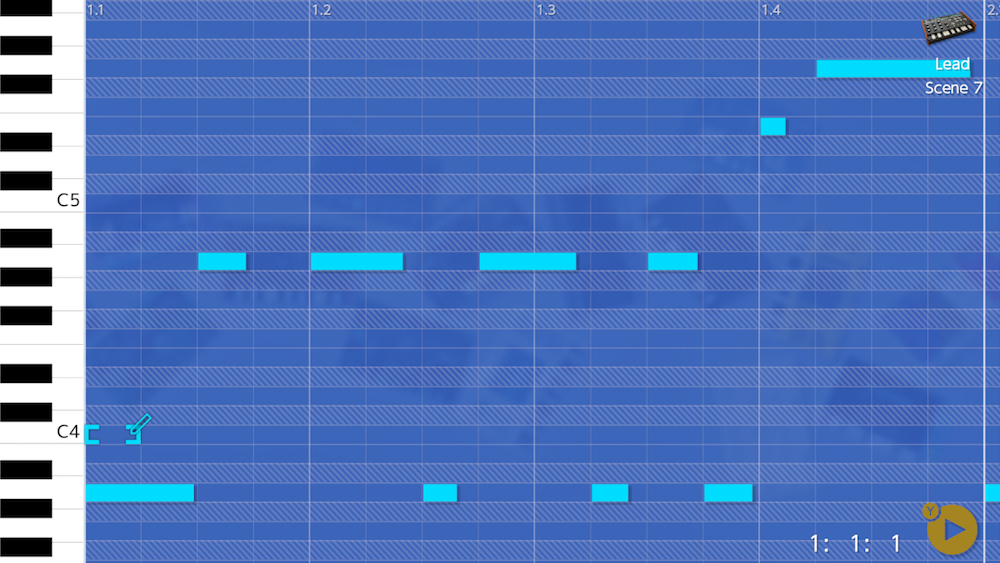
Piano Roll Screen Operations
This screen allows one to display/edit notes for currently selected clip
Main Operations
|
Place / Remove Note |
Pressing the A button places a note at the current cursor location. If there is already a note there then it is replaced. While the A button is pressed, you can use the left joystick or the direction button to adjust the length of the note by moving left or right. |
|
Adjust Note Length |
Move the right joystick left or right to shorten or lengthen the note at the cursor. |
|
Set Clip Length |
Select “clip length” from the menu to set the number of bars in a clip. The maximum is 8 bars. Also, selecting “Display Range” from the menu will allow you to set the number of bars displayed on the screen. |
|
Grid Settings |
By setting the “Grid” in the menu, you can set the grid to display with 8th note or 16th note resolution. Also, when adding notes they automatically snap to the grid. To use triplets, please access the “Grid” menu and select “triplets” or move left and right to turn triplet mode on and off. |
|
Editing Velocity (volume) |
Selecting “Edit Velocity” from the menu to display the note velocity (volume). Move the right joystick up or down to adjust the velocity. |
|
Edit Automation |
Selecting “Edit Automation” from the menu will display the gadget parameters. Use the right joystick to adjust them up or down. |
Convenient Functions
|
Select Range (combined edit) |
To select a range, hold down the ZR button and move the cursor. This makes it possible to edit or delete multiple notes simultaneously. |
|
Copy & Paste |
After copying a range, select “paste” from the menu and select a location to paste the information. |
|
Undo |
Select “undo” from the menu to undo the previous operation. |
|
Move to Different Track / Scene |
Press the L button to enter the shortcut screen, then use the left joystick or the direction buttons to move between tracks or scenes. |
|
Display Scale Tones |
On the piano roll screen, notes that are not members of the selected scale are displayed with diagonal lines. It is possible to create a musical tune just be avoiding the notes with hatched lines. |
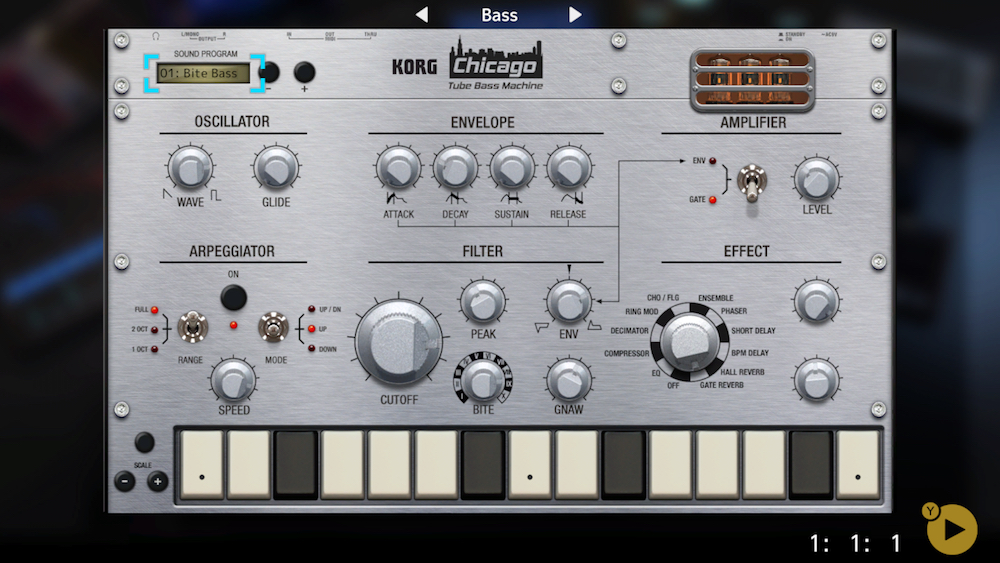
Gadget / Mixer Screen Operations
This screen allows one to edit and view parameters for gadget instruments and the mixer.
Main Operations
|
Nob, Fader Operation |
When a nob or fader is selected, moving the right joystick up or down will adjust the associated parameter. |
|
Parameter Adjustment |
Holding down the ZL button when using the right joystick to make parameter adjustments will allow for more detailed setting. |
|
Joy-Con Motion Parameter Operation |
When a nob or fader is selected, hold down the A button and move the Joy-Con left, right, up, or down to adjust parameters. |
Convenient Functions
|
Preview Sound |
Press the ZR button and the gadget will produce a preview sound. This makes it convenient to adjust the parameters while listening. |
|
Save / Delete User Presets |
To save the current sound, select “Save User Preset” from the menu and assign it a name. Saved user presets may be used in other songs. To delete a user preset, select the user preset that you wish to delete and then select “Delete User Preset” from the menu. |
|
Motion Performance / Controller Performance |
Pressing the “-” button will display then menu, after which you may use the Joy-Con to engage in a motion performance or perform using the controller buttons. |
|
Move to Different Track |
Press the L button to display the shortcut screen, then use the left joystick or the direction buttons to move to a different track. |
Play/Record Operations
|
Loop Playback for Scenes |
Press the L button to enter the shortcut screen and then use the Y button to toggle loop playback on and off. This can also be toggled from “Menu” → “Playback/Recording” → “Scene Loop Playback” |
|
Recording |
Long-press the Y button to enter recording mode. Keyboard performances, preview tones, and motion performances on the gadget will be recorded. |
|
Recording Nob and Fader Operations (automation) |
Operations conducted on the nobs and faders of a gadget while in record mode are also recorded. |
Tech Glossary
|
Track |
This represents one part of a song, corresponding to one gadget. A song is made using multiple gadgets, for example a drum track, a bass track, etc. |
|
Clip |
A “clip” is a collection of note data. The gadget instruments on each track play the notes in the clip. Each track can be set independently, and each clip may have a different number of bars. |
|
Scene |
Horizontal columns are blocks making up a song. The clips on each track are played at the same time. A song is composed of "scenes" such as "INTRODUCTION", "MELODY A", "BRIDGE", etc. in units of bars. |
|
Gadget |
This is the name for our compact synthesizers and drum machines. |
|
Note |
A note contains pitch and duration information. |
|
Velocity |
This controls the volume of a note. |
|
Scale / Key |
Set the scale and the key of a given tune. |
|
Automation |
Record the movement of a gadget's nobs and sliders. |
|
Quantize |
Adjust the timing of recorded notes. |
|
User Preset |
Customized gadget sounds created by the user can be saved. |